Print
Gluten-free Sourdough Starter Guide
Make a gluten-free sourdough starter from scratch with this guide.
Prep Time 5 minutes
Additional Time 10 days
Total Time 10 days 5 minutes
Servings 1 cup
Ingredients
- 1 cup 164 grams Gluten-free Flour
- ¾ cup + 2 Tablespoons 190 grams cool water
Instructions
-
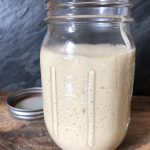
On the first day, you’re going to measure out a cup of gluten-free flour (164 grams) and stir it together with ¾ cup + 2 Tablespoons (190 grams) cool water. Cover with a lid or loosely with plastic, leave in a room-temperature or slightly warmer than average place, and make yourself a reminder to visit your starter at the same time again tomorrow.
-
On the second day, take a look at your starter and smell it. There probably won’t be any noticeable changes, but getting acquainted with your starter is key in recognizing when it’s developing, and eventually matures. The feeding process is a simple science, but using your senses to understand how your starter is progressing is the real art of sourdough.
-
After you’ve examined the starter, scoop out half of it, and discard it (or save it for another recipe.) Add ½ cup (82 grams) of fresh gluten-free flour and ¼ cup + 3 Tablespoons (95 grams) of water. Stir together, cleaning down the sides of the container, and cover. This is your first “feeding”. Leave it for 24 hours.
-
After the first or second feeding, you may begin to see some tiny bubbles developing in your mix. After about 5 or 6 days you might begin to see your starter rising, with larger gas bubbles developing in the body of the mix and on the surface. Don’t be discouraged if it takes a little longer to see & smell changes. There are a lot of environmental factors at play here, but rest assured that wild yeast is everywhere. It’s only a matter of time before your starter begins to ferment.
-
On the third day repeat the feeding process by first examining your starter, then discarding half of it and adding fresh flour and water. You’re going to repeat this feeding process every day until you’re ready to bake with it, and for as long as you want to keep it alive.